Thursday, August 16, 2012

No. 3

No. 3. A simple name for this basically simple card. It's all Stampin' Up, and that doily stamp is so pretty and detailed. I didn't even mask, just stamped the pink flowers right over the taupe doily.

I've been busy getting my Halloween ideas all together in my head and on paper. This year I am starting early and making a lot of decorations. I'm using many thrift items, and have started the purchasing process. I hit Hobby Lobby, for fresh new items, and The World Mission Thrift Store for all of the 'good' stuff. I actually got several items for Fall decorating at Hobby Lobby since everything in that dept. was 40% off.
Thanks for the visit, and comments!
Lori  *smile*
Home and Garden Thursday
Treasure Hunt Thursday  
Bloom Link Party
Wildly Original Linky Party


Wednesday, August 15, 2012

Grand Openings~Give Aways~And More

 I would like to let you know about a new shop:


All Things Home and Country French Inspired. I'm super excited, because I just last night decided to decorate my home in Country French. She is also having a give a way for her blog followers at From My Front Porch To Yours. Read about her GRAND OPENING here.

Hi everyone! Just wanted to correct my post of yesterday. '30 Days of Lists' registration is open through September. It was pre-registration that closes today. There is still time!


I also wanted to let you know about 'Home Organization 101', at A Bowl Full of Lemons.This will be my first go round with this challenge. Click over to check it out.

That's it for now, hope to get a project up later today!
Lori

Tuesday, August 14, 2012

30 Days of Lists

I wanted to share my "30 Days of Lists" cover. What is "30 Days of Lists"? Find out all about it HERE. It's my first time trying this, but it sounds like so much fun! This is for you if you especially enjoy lists like I do. Registration closes tomorrow so hurry over. I haven't decided how to keep my book together, but I think I will just add 2 or 3 rings.
This was a little bonus list that the ladies came up with, so that everyone could get an idea of what this is all about. A weekly menu list, how easy is that? I was able to 'fun' my page up a little, because my husband wanted a cherry pie. It was a busy week for soccer, so the meals were pretty simple.
Here is a little close up to show the bit of bling on the pie tin.

Thanks for the visit! I would love to know what you think and see you join me at the "30 Days...".
Lori
Linky Parties and Challenges:
Anything Goes at Eye Heart Mondays 
Make the Scene Monday
Nifty Thrifty Tuesday  
One Project at a Time
Your Gonna Love It Tuesdays! 


Thursday, August 9, 2012

What I've Been Up To

Here is a peek at what I've been doing.
I've been cutting stacks and stacks of referee cards for a soccer tournament.Why? 'Cause that's what soccer moms do. Plus my husband is on our local soccer club board.
This is  only a tiny stack, because I was to lazy to go into the kitchen to take a picture of what I did earlier
Look closely......why, oh why, is the top, left card print upside down?!? Let me tell you that it may not seem like a problem, but it is. I asked my husband who the moron was that set up this print. Can you guess who? Yep, the hubby did it. I complained that they didn't line up for a single cut. He said that's why he was going to cut them all by hand. /There. /Are. /Hundreds./ You can see by the scraps that several cuts were necessary to trim the cards into the 2" x 3" required size. That was hard on my "sort of perfectionist" self.
 
Whoever gets the job of  "referee co-ordination" next year will have a head start on the cards, because I know we won't need them all now. There are even more to cut up....my dearest has the habit of copying way more than necessary-of anything I ask him to copy, like our insurance cards to add to our daughters sport, camp, and trip forms. Gotta love a man like that! He is the best ever, I'm a lucky woman.

Oh, I almost forgot to tell you about running around looking for whistles last night, (before starting the cutting). Referees just took them home last year so they only have 10 left. Joe wants to have 10 more, so my husband and I went to 3 stores and found the last 10 metal ones at our local Meijer store. The rack they were on said $1.99. The ones above were $3.99, they were black and I figured they must be plastic covered metal. Ours rang up at $3.99, so the cashier called back and they told her to give them to us for $1.99. All of them. How about that? A stock person goofed in our favor.

Tomorrow evening our dear daughter will play, high school division and the adult divisions will also play. Saturday our dd will be a referee, she said she still has her whistle from last year. I just said make sure you collect them this year.

Hope someone gets a kick out of my rambles. If not, it was fun to write anyway!!!!

Birthday Star

Happy Birthday Stars Card:
This is a fun birthday card because stars make a person feel like.....well.....like a star. Right? This is an all Stampin' Up card, made with my girlfriends at stamp camp in July. I still have 4 cards I haven't shown you yet and we have another party next week. Life is good. School is getting closer and I don't want my daughter's senior year to start just yet, but it will.

Here's a close up:

thanks for visiting and leaving a comment
Where I play and party:
Wildly Original Round Up at I Gotta Create!
Look What I Made at Creations by Kara
Treasure Hunt Thursday at FMFPTY
Bloom Designs Link Party at Bloom Designs
Home and Garden Thursday at A Delightsome Life
Creative Thursdays at Michelle's Tasty Creations and Crafty Ideas


Wednesday, August 8, 2012

"Tell me, tell me you love me"

I just wanted to update you all on the title I picked for this ATC:
Thank you to all who responded on this post. I decided to use Robyn's title suggestion, "Tell me, tell me you love me". I think it is perfect. Not only that, but I visited her blog and her projects are awesome!!! Go see what Robyn, at Scrapbooks and Journals is up to. Lots of inspiration there. Thanks again Robyn!

Monday, August 6, 2012

Coupon Keeper Tutorial

My New Coupon Keeper


A Bowl Full of Lemons
My Pinterest inspiration came from Toni at A Bowl Full of Lemons, (pictured at right). Her post lead me to The Krazy Coupon Lady for even more ideas. The KCL offers free printables too.
I'm no a coupon superhero, so my Coupon Keeper is just that, a coupon holder for now. Toni has all kinds of extras in her binder, so check out A Bowl Full of Lemons.


This is my first tutorial, so please bear with me. Bear, as in to endure and/or tolerate, not the big furry mammal with claws. Not bare, as in naked either. That would be awkward.
Don't forget to read the entire tutorial before you start. Click On Any Photo To Enlarge

You Will Need:
-4 long envelopes sized 4 1/8"x9 1/2", either style shown [pic 1]
-1 piece of 12"x12" card stock, (cs) or heavy designer printed paper [pic 2]
[pic 1]
For the Cover:
[pic 2]
1. Cut the 12"x12" cs to 9"x12"
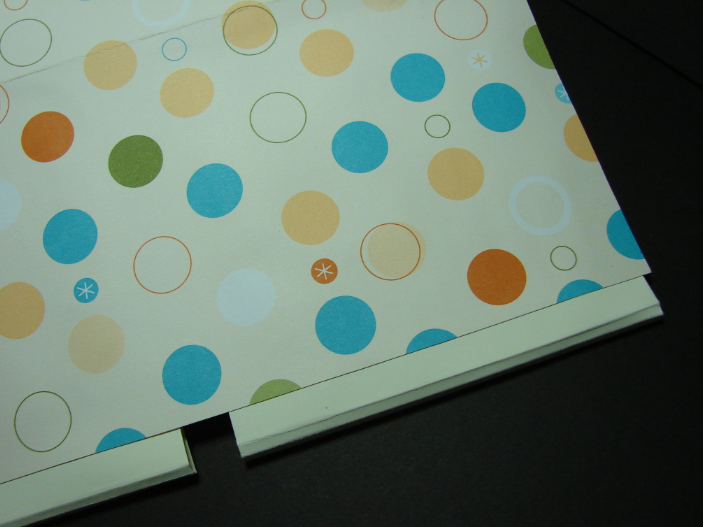
2. Be sure the cs is landscape positioned as shown [pic 2]. Score at 8" & 7"~ this will be the bottom or base when Keeper is closed
3. Continue to score at 2 1/2", 2 1/4" and 2", (for flexibility ~ this will be the flap that folds over at the top when Keeper is closed~left side of [pic 2]
4. Fold each of the score lines


For the Inside Envelope Pockets:
[pic 3]
1. For the envelope that opens on the long side: slit one short end thus becoming the Designated Flap End [pic 3]
2. Seal the envelope as you normally would
3. For the envelope that opens on the short side: leave it alone, this is the Flap End


[pic 4]


When Cutting and scoring, Start With the Flap or Designated Flap End on the Left  [pic 4]

4. Cut 2 of the envelopes to 9", and then score & fold at 4 3/4", 4 1/2" & 4 1/4" for flexibility (the top row)
5. Cut 2 of the envelopes to 8 3/4" then score/fold at 4 5/8", 4 3/8" & 4 1/8" for flexibility (the bottom row)

To Attach the Envelope Pockets:
[pic5]
1. Apply adhesive to the back of each envelope, making sure the Flap/Designated Flap is at the top, face up
2. Attach envelope pockets, making sure they are folded and glued in the correct direction/position.
*[pic 5]-showing envelopes folded up with both of the openings orientated to the top
*[pic 5a]-showing the bottom 2 envelopes unfolded
3. The bottom 2 envelope pockets hang over the cs, [pic5b] but that is ok, it fits  when closed/folded up 


[pic 5a]


[pic5b]


To finish:
1. Label the 8 pockets as desired
2. For the closure attach a button, brad, magnet, string, or ribbon as desired


This is how I finished mine:

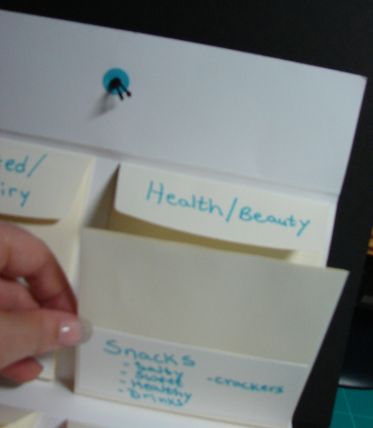
My Eight Envelopes Labeled
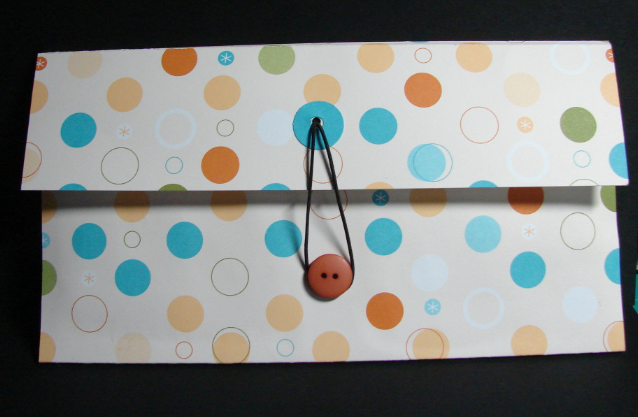
Coupon Keeper Closed
Closed & Fastened


Showing one half of envelope partially up
Showing one envelope unfolded


Please let me know if you have any questions. Did I miss anything? Does it make sense? Thank you very much for all of your feedback, it will certainly help with the future tutorials that I have planned!!! I toyed with the idea of calling it a Koupon Keeper. Silly?

I'll be sharing with these Link Parties and Challenges:
The Pinterest Challenge
Homemaker in Heels: Weekend Craft Soiree 
**My entry into Overflowing with Creativity at It’s Overflowing is sponsored by Appliances Online and their Best Freezers!**
Seasonal Sundays at The Tablescaper  
Nifty Thrifty Sunday at Nifty Thrifty Things
Meet Me Monday at You're Talking To Much  
Anything Goes At Eye Heart Mondays 
***My entry into Nifty Thrifty Tuesday Party is sponsored by Appliances Online and the Best Range Cooker.***
Make the Scene Monday at Alderberry Hill                   

LinkWithin

Related Posts Plugin for WordPress, Blogger...